


|
Application bugs & quirks
Fonts not kerning properly in Photoshop
Always use metrics setting for kerning:
In the Character panel, set kerning to Metrics. This forces Adobe Photoshop to use the original kerning of the font. You can still manually kern letters with this setting if needed. Often, Photoshop can do a poor job of spacing letters when kerning is left blank, set to "Optical" or "0". However, when you set kerning to "Metrics" it displays the font with the original kerning as intended. 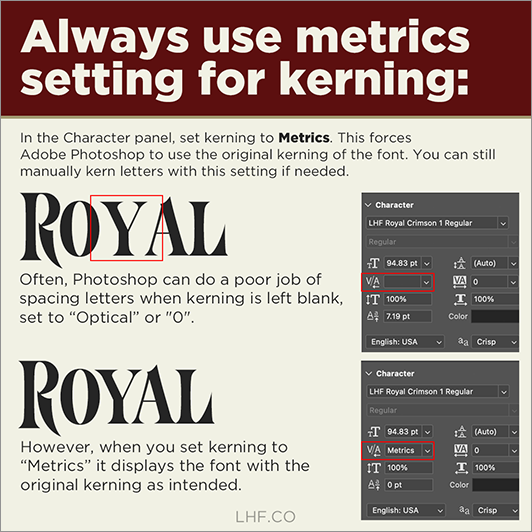 Letters cut off when creating PDF from Microsoft Word When saving as a PDF from Microsoft Word, some letters may have the bottoms or sides cut off. The cause of this seems to be the PDF driver that Word is using to create the PDF. The solution is to choose "Print" and then choose "Adobe PDF" (if available) or "Microsoft Print to PDF".
Letters appear jagged after installing Applications were open when the font was installed. It is important to ensure that all programs are closed when installing your fonts. Simply restarting the computer should fix the issue. If the problem remains after restarting the computer, uninstall the font, then restart the computer and reinstall the font. This primarily affects Adobe products on the Mac.
Browser difficulties downloading fonts on Mac Older versions of Safari browsers are not compatible with our system's packaging and download method. Please use the latest release of Firefox or Chrome instead.
Trouble downloading on iPad There is a known compatibility issue with our package creator and the iPad. Please download the fonts from your Account Manager using a desktop or laptop computer and then transfer them to your iPad.
OpenType alternates not working in Illustrator CS5 There is a known issue with Adobe Illustrator CS5 that prevents OpenType
alternates from functioning properly. The "Glyphs" window will not display
the correct alternates available for each glyph. The solution is to update
Adobe Illustrator CS5 to version 15.0.2. Use the Adobe Application Manager to update or download from the Adobe website.
Fonts not showing up in CorelDRAW
There are two causes for this:
1. CorelDRAW allows you to turn off certain types of fonts. Assuming you have installed the fonts correctly into the system, it is likely that you have turned off the option to display Type 1 fonts. To remedy this, create a new file in CorelDraw. Then go to: Tools > Options > Text > Fonts and make sure you have Show Type 1 Fonts checked. 2. CorelDRAW X3 contained a bug which prevented Postscript OpenType fonts from working. The solution is to install the latest patches for CorelDRAW X3, which you can find here: ftp://ftp.corel.com/pub/CorelDRAW/CorelDRAWGraphicsSuiteX3/ You must first download and install: CGSX3SP1.msp And then: CGSX3SP2.msp When properly patched, the new version should read: 13.0.0.739. Can't create PDF from Quark Some people have reported receiving font related errors when attempting to create a PDF containing Postscript OpenType fonts from Quark.
The culprit is Quark's PDF driver. For some reason it does not work with Postscript OpenType fonts. Using a different PDF driver by printing to it will allow you to create your PDF. Go to "Print" and see if you have another PDF printer available. If you have Adobe software installed, you will see "Adobe PDF" as an available printer. Windows users will also have "Microsoft Print to PDF". It is also possible to download an old version of Acrobat Distiller (the old name for the driver) for free from some sites and install it. Make sure to check any file you download for Malware first. LHF Packard Script Swashes issue in CorelDraw When we first released LHF Packard Script, we found an issue with the Packard Script Swashes which was causing some issues in newer versions of CorelDraw (the problem was discovered in X5 but X3 and X4 may have it as well. 12 had no issue). Installing the updated font files from your account manager will resolve this issue.
CorelDraw couldn't handle the widths of the swashes, causing the swashes to display incorrectly in wireframe view and when converting to curves. All three fonts were updated in order to fix the issue, so be sure to uninstall and replace LHF Packard Script Regular and LHF Packard Script Fancy along with LHF Packard Script Swashes. This is a free download for customers who purchased LHF Packard Script (version 1.0) before 4/11/2011. To download the updated versions, simply login to your account and download it again. Preview of updated font is same as old (Windows) Windows users must be aware that when you double-click on an updated font that has the same name as a font you already have installed, Windows shows you a preview of the installed version rather than the actual updated version. All versions of Windows behave this way. For example, let's say we issued an update to a font, revising it from 1.0 to 2.0. You then download this new version from your account and save it to your Desktop. Double-clicking on the font to see a preview, shows you a preview of the installed version (which reads 1.0), rather than the font you have actually downloaded (version 2.0). This is because the new version has the same name as the installed version. Windows is actually showing you a preview of the installed version. This is why step number 1 is uninstalling the old font. If you uninstall the old version from the Windows Fonts folder first, and again double-click on the new version, you will see the correct preview. Once the new version is installed, open your application. With the newly installed font chosen you can easily check which version you're currently using by typing the bar (straight vertical line) character: |. The bar character is usually located above the Enter key on your keyboard. Typing that key will generate the LHF insignia with the current version number and release date.  Unable to install font: File is either invalid or damaged There are two potential causes for this error.
Attempting to drag the .zip package to the Font folder You will receive this error on a PC when you attempt to drag the compressed .zip package you downloaded to the Font folder. Rest assured, there is nothing wrong with the fonts. Windows is expecting font files, not a .zip package, so it returns this error message. Never try to place a .zip file in the Fonts folder. You must first extract the fonts from the package you downloaded. After you have properly opened the package, you may drag the fonts to the Font folder to install. Please follow the instructions above for installing your fonts. Graphics card memory bug There is a known bug with certain graphics card drivers that prevent XP from using or installing OpenType fonts. The recommended fix is to update the graphics card driver. If you cannot do this or do not want to do this, the following fix also works. IMPORTANT! Do not attempt to apply this fix unless you are familiar with tweaking the Windows Registry, otherwise a mistake can cause serious problems with the system. • Click Start button, then choose Run • Type: regedit • Click OK button • Navigate to: HKEY_LOCAL_MACHINE\SYSTEM\CurrentControlSet\Control\Session Manager\Memory Management • Click on the Memory Management folder • Go to Edit > New > DWORD Value • Name the value: SessionImageSize • Right click on SessionImageSize and choose Modify • For Base, choose Decimal and type 20 for the Value Data. Then click the OK button • Close the Registry Editor and restart the computer See this News post for more information. Layered fonts not aligning properly in SignLab 10 If your layered fonts are not aligning properly in SignLab 10, it may be due to a duplication setting, or because the program is scaling the layered fonts to match in both height and width, by default.
To alleviate this problem, first go to Options > SignLab Setup > General Preferences... Set the Duplicates to x=0 and y=0. This ensures that when using Ctrl+D to duplicate your text for layering Multi-part fonts, all the layers of text will be duplicated directly on top of each other. Next select the Text Compose tool to enter into Text Edit mode. To the right of the font selection drop down menu, click on the Font Height Options drop down arrow. 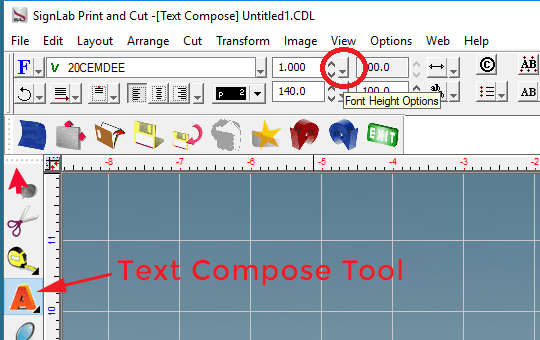 This will open the Font Scaling dialog box. For Windows Fonts set the height to Windows. For CADlink and non-Windows Fonts set the height to Capital H. Now SignLab will display Multi-part fonts at the correct size when layered with each other. 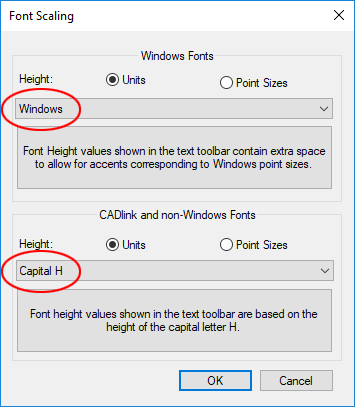 If you are using SignLab 9 or older, unfortunately there is no option to apply different height settings for Windows and non-Windows fonts. We suggest using another layout program, such as Adobe Illustrator, for your text layout. Then convert all text to outlines/curves before importing as vector shapes into SignLab 9. Layered fonts not aligning properly in FlexiSign By default, older versions of FlexiSign change the height of all fonts, using the uppercase X as it's guide. Since layered fonts like LHF Quadrex for example, do not contain a full uppercase X within the prismatic pieces, the individual fonts will not align properly.
To alleviate this problem, go to Edit > Preferences and click the Tools tab. Scroll down on the left side and click on Text Tool. On the right side check "Use Font Height". The multi-part fonts will align properly now. This applies to all layered fonts. Layered fonts not aligning properly in VinylMaster If your layered fonts are not aligning properly in VinylMaster it is most likely because the program is scaling the two fonts to match in both height and width.
To alleviate this problem, go to Text and uncheck Font Scale. You must do this before typing out your text. Please note that Font Scale will still look like it is checked in the Text drop down (even after you have unchecked it) until you type out your text. 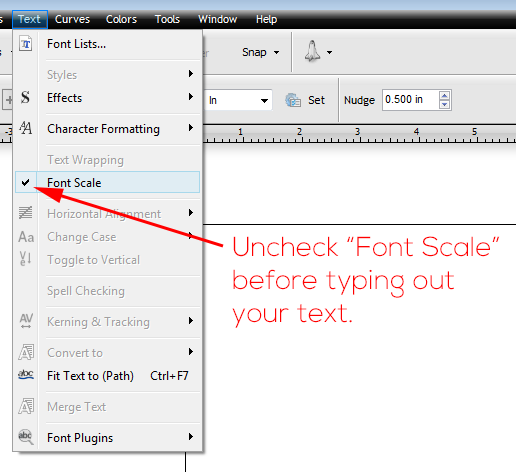 Layered fonts not aligning properly in Photoshop Layered fonts such as LHF Quadrex do not align when the Photoshop kerning settings are set to Optical .
To alleviate this problem, make sure your kerning setting is set to either 0 (zero) or Metrics. Open your character palette. Go to Window > Character and set the kerning drop down menu to either 0 (zero) or Metric. 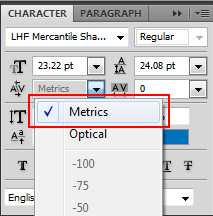 Layered fonts not aligning properly in Illustrator Layered fonts such as LHF Trolley do not align properly when they are layered using texboxes.
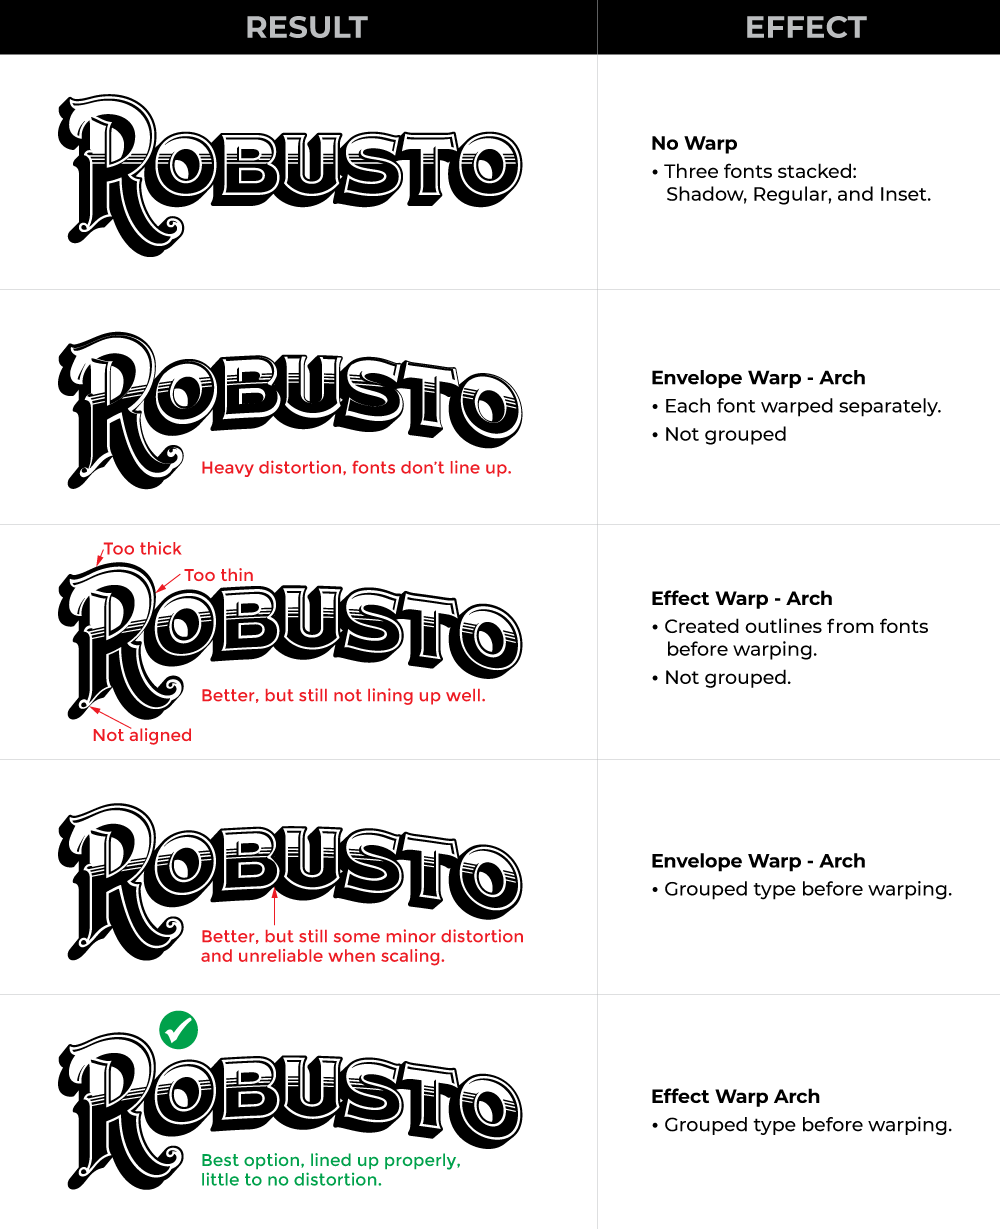
To alleviate this problem, highlight the layered textboxes that are misaligned and in the top menu bar select Type > Area Type Options. When the options window opens look for Offset > First Baseline and in the dropdown menu change it from "Ascent" to either "Leading, Em Box Height, or Fixed". You will need to experiment with these three options depending on which Layered fonts you are using. 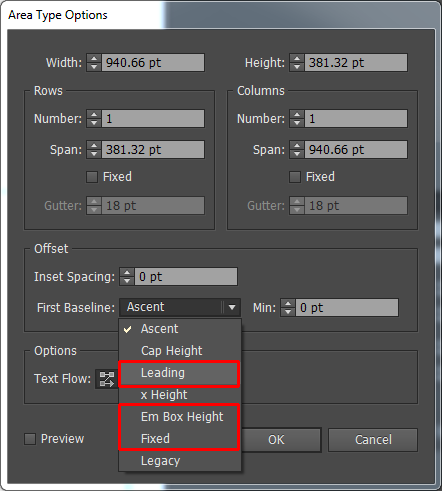 Layered fonts not aligning properly when Warping text If you've added a warp (Arch, Rise, etc.) to Multi-Part fonts and they are not lining up properly, it's likely because the fonts were not grouped prior to warping. For best results in Adobe Illustrator, always use the Warp effect from the Effects drop down menu. Don't use the Envelope Warp within the type options. Click the image below to see the best way to warp layered fonts in Adobe Illustrator.
Unable to scroll through font list in Illustrator CS4 When using the arrow keys on the keyboard to scroll through the fonts list, Illustrator CS4 will freeze on inferior fonts. While this does not apply to fonts you download from Letterhead Fonts, you may alleviate this problem when using other fonts by choosing: Edit > Preferences > Type.
Then uncheck Enable Missing Glyph Protection.
Applying Bevel to text crashes CorelDraw X4 CorelDraw's new Bevel feature is quite buggy. It seems it does not like Postscript fonts. As a result, attempting to apply a bevel effect to Postscript fonts causes the program to crash. Since the path direction is different for Postscript fonts than for TrueType fonts (and TrueType fonts don't cause the problem) we suspect the cause is the path direction.
As a work-around try reversing the path direction using the "Shape Tool". Right click on the desired path and choose "Reverse Curve". If you are working with letters that contain an outside and inside path (such as an "O"), you do this for the inside path as well. Other work-arounds might include converting the font to vector curves before applying the effect and reducing the number of nodes (points). Font Book error message: "Font May Be Damaged" Sometimes the Font Cache may become corrupt and cause various problems for Mac users. This particular error is usually related to a corrupt font cache and erroneously blames the font itself. However, the font usually isn't the problem. Below are instructions for manually clearing the Font Cache if you are using a Mac.
Mac OS X 10.3 (Panther) Close all applications. Drag the following files and folders to the Trash. /Library/Caches/com.apple.ATS /System/Library/Caches/com.apple.ATS.System.fcache /System/Library/Caches/com.apple.ATSServer.FODB_System /System/Library/Caches/fontTablesAnnex Restart the computer. You can't empty the Trash until you restart. Mac OS X 10.4 (Tiger) Close all applications. Go to /Library/Caches/ and drag the "com.apple.ATS" folder to the Trash. Restart the computer. Mac OS X 10.5 (Leopard) and later Close all applications. Launch Terminal Enter the following command at the prompt and press Return: atsutil databases -removeUser Enter the following command at the prompt and press Return: atsutil databases -shutdown Enter the following command at the prompt and press Return: atsutil databases -ping Quit Terminal If you prefer, we've discovered a couple of applications that will automate the above process and repair the font cache cache for you: http://www.markdouma.com/fontfinagler/ https://www.titanium-software.fr/en/onyx.html If the issue persists after clearing the cache and restarting, please contact us. Suitcase Fusion: Problem font cannot be rendered The fonts really are not the "problem" as Suitcase Fusion is reporting. You may receive this error when attempting to preview one of our panel or ornament fonts. These fonts are particularly large (both in scale and file size) and it seems Suitcase Fusion 6 has difficulty in rendering them in it's preview window on heavily taxed systems or those with low RAM resources.
One work around is to go to Edit > Render Problem Font. 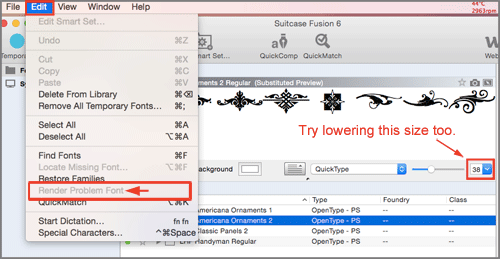 It might also help to lower the rendering size. There actually is nothing wrong with the fonts themselves. Even if Suitcase Fusion refuses to render the preview, they will work properly in the applications. Illustrator error message: "Can't Print Illustration" If you have recently installed new fonts and receive the error message, "Can't Print Illustration" when trying to print from Adobe Illustrator, there are some steps you'll need to take to alleviate this problem:
• Uninstall/reinstall your printer software and then restart the computer • Check that your printer settings are set to turn fonts to outlines The printer should now recognize the fonts and allow you to print. If the problem still persists, please let us know. Fonts won't print to HP LaserJet Printer Some Windows users may have trouble printing certain fonts (not just LHF fonts) using HP Color LaserJet Printers. Users will notice some fonts print fine, but for other fonts, the LaserJet will print blank space where there should be text. In some cases the print job won't even make it to the printer after clicking "Print". This is not an issue with the fonts themselves, but an issue with the HP LaserJet's printer drivers. The solution is to use the HP Universal Print Drivers. We recommend trying the PCL6 version first:
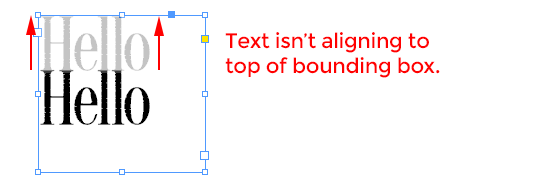
https://support.hp.com/us-en/drivers/selfservice/hp-universal-print-driver-series-for-windows/503548/model/4157320 InDesign / Illustrator text in bounding box too low Is your text not aligning to the top of your bounding box in Adobe InDesign or Adobe Illustrator? Most programs align the text using the font's ascender height. Since this height differs between all fonts, you may notice that the text does not align to the top of the bounding box for some of them.
 InDesign Solution: Highlight the text within your bounding box, then go to Object > Text Frame Options. This will bring up a window with options and three tabs. Click the Baseline Options tab. Under the options for First Baseline, click the Offset drop down menu and change it from Ascent to Cap Height. Keep in mind that fonts may have different ascenders and cap heights, so you may want to experiment with the other options in the Offset drop down menu. 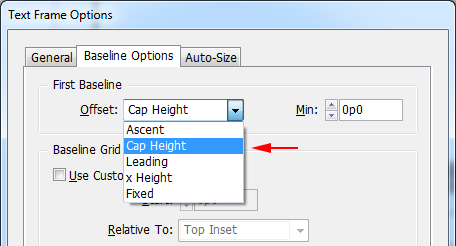 Illustrator Solution: Highlight your text, then go to Type > Area Type Options. This will bring up a window with options. Under the options for Offset, click the First Baseline drop down menu and select Cap Height. Again, this may not work on all fonts that have this issue, so you may want to experiment with the other options in the First Baseline drop down menu. 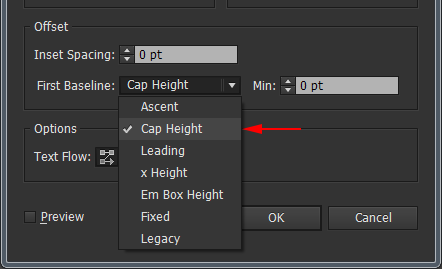 Dec. 11th, 2012 Windows update affects fonts Windows users who installed the latest update on December 11th, 2012 experienced Postscript OpenType fonts disappearing from applications. This affects all Windows users. This issue is not unique to LHF fonts, but rather all Postscript OpenType fonts.
Typical applications that experience this problem are: CorelDraw, Flexisign, Signlab, Inkscape, Powerpoint, PaintShop Pro, and Quark. Microsoft fixed the issue on December 20th, 2012, so the remedy is to simply get the latest Windows update from Microsoft. More about the original issue here. |
FAQ
Before You Order Ordering Accessing Alternates Downloading Fonts Redownload Fonts Updating Your Fonts Installing Your Fonts Using LHF Desire Convert to Outlines Compatible Programs OTF Test Font Bugs & Quirks License & Usage Tutorials Contact Us |
  |
||
 |
|
||||
|
|||||
|
CONTACT |
|