 |
||||
 |
||||
|
|
||||
 |
ACCOUNT LOGIN |  |
YOUR CART |  |
|
Chrome EffectsChuck Davis demonstrates how to create chrome effects with LHF Boston Truckstyle without using any third-party plugins. 1. Type your text The number values in this tutorial apply to a 300 dpi image at 1269 x 452. You may have to adjust the numbers according to the size and dpi of your image. Choose a rather bold typeface with thick enough strokes to show the chrome effect. Type your text in white and kern properly. Duplicate this layer by using the flyout menu on the Layer palette. You will need this extra layer later. 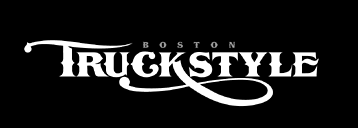
If you look closely, you'll notice this image has light gray streaks across it. To do this, create a mask around your lettering by holding the Ctrl key while selecting one of the layers with the lettering. Select the airbrush tool and change opacity to 10. Using black color and a soft brush slightly larger than the opening of the “R,” airbrush light horizontal streaks across the letters. Make sure your strokes are light and even. Here, I have airbrushed at the top, middle, faintly at the bottom and at the bottom of the “K.” This step is crucial. Tip: In versions prior to 6, you can hide the dotted line mask surrounding your text by going to View | Hide Edges. In version 6 you would go to View | Show | Selection Edges. 
3. Add dimension
Go to Select | Deselect to deselect the text. Choose white as your foreground color and black for your background color. Go to Filter | Sketch | Bas Relief and use the following: For Detail use 10, for Smoothness use 2. Make sure your Light Direction is set for Bottom. 
4. More dimension This step varies depending on which version of Photoshop you are using. Version 5.5 or earlier: Go to Layer | Effects | Bevel and Emboss, select Outer Bevel and set Angle to 120°. Set Depth to 5 and Blur to 4. Set Highlight Mode to Screen and use white at 88% opacity Version 6: Go to Layer | Layer Style | Bevel and Emboss select Outer Bevel and set Angle to 120°. Set Depth to 100% and Size to 5. Set Technique to Smooth and Direction to Up. Use white at 88% opacity for Highlight Mode and set at Screen. 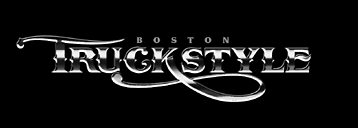
Click on the Rectangular Marquee Tool and draw a box around the bottom portion of the letters starting at approximately the center of the letters. Then go to Select | Feather and use 10 pixels. Then go to Image | Adjust | Hue/Saturation. Check the Colorize box and use the following settings: Hue: 34, Saturation: 39, Lightness: +15. Next, go to Image | Adjust | Brightness/Contrast and use the following settings: Brightness: +63, Contrast: +55. These settings will depend upon how dark or light your image is and may vary slightly. 
|   |
|||
 |
 |
||||

|
|||||
|
CONTACT |
|