


|
Easy HighlightsThis is such a simple effect, anyone can do it. Sure, there are filters that will create highlights. But sometimes they can be sloppy and fuzzy. This method will create more accurate, crisp highlights. Although these steps are meant mainly for Photoshop, the basics of this technique can also be used in any program-- including vector-based. LHF Menace is used in this example. It's best to do this step after you have applied your outline and all other effects. That way you'll be better able to judge the width of highlight you will need. So assuming you have nearly completed your design, make two copies of your text layer. Then change one of the layers to black (or a color different from the original color). For the sake of this tutorial I will be referring to the duplicated layers as orange and black. 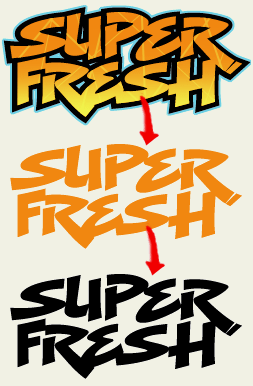 2. Move black on top Place the black layer on top of the orange layer we duplicated from the original. At this point we need to decide where our light source is coming from. I usually pretend my light source comes from the top left. This allows me to put shadows to the right and bottom (after the eye has read the text). Assuming your light source is coming from the top left, position your black layer so that it reveals a small portion of orange on the top and left.  3. Select top layer Select your black layer by clicking on the layer and holding CTRL. This creates a mask around the black letters.  4. Delete Select the layer with the orange letters and hit the Delete key. Then turn your black layer off. This reveals a "punched" effect. Now we have exactly what we need to create our highlights. All that's left is to change the color from orange to white. 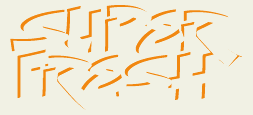 Change the color of the orange layer to white by going to "Image > Adjustments > Hue/Saturation" and moving the lightness slider to +100. Then postion this layer on top of our original text. Reduce the opacity of this layer by using the opacity slider on the layers pallette for a more authentic look. Finish off by adding some "hotspots" with the airbrush tool. 
|
  |
|||
 |
|
||||
|
|||||
|
CONTACT
|
|
|
|
|
|
|